
How to Tie a Tie Easy: Step-by-Step for Any Occasion

I remember the first time I had to wear a tie. It was my cousin’s wedding, I was 16, and I spent 25 minutes in the bathroom struggling with that silk strip around my neck. My dad walked in, tied it perfectly in under 90 seconds, and walked back out without saying a word. I felt a little embarrassed — but mostly, I just wanted to know the secret.
If that story sounds familiar, you are in exactly the right place. Whether you have a job interview tomorrow morning, a wedding this weekend, or you just want to finally crack this skill, this guide will show you how to tie a tie step by step — in plain, simple language, no experience needed.
We cover the three most useful knots every person should know: the Four-in-Hand (the easiest one), the Half Windsor (the everyday go-to), and the Full Windsor (the big formal knot). By the end of this guide, you will know which one to use, how to tie it, and how to make it look sharp every time.
Before You Start: What You Need to Know About Your Tie
Before you dive into the steps, it helps to know a few simple things about a tie. This will make every step easier to follow and remember.
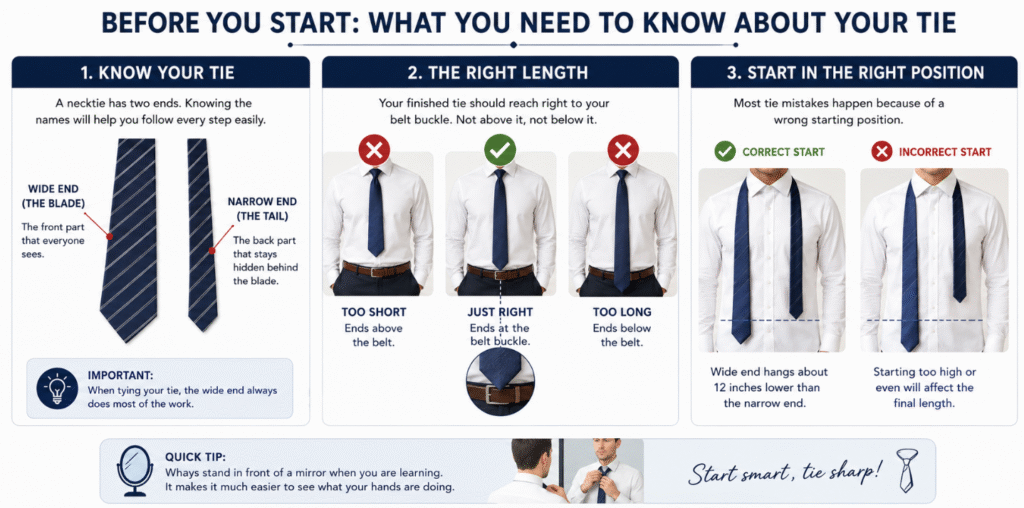
A necktie has two ends. The wide end is called the blade, and it is the front part that everyone sees. The narrow end is the back part that hides behind the blade. When you stand in front of the mirror tying your tie, the wide end always does most of the work.
Here is a handy rule to remember: your finished tie should reach right to your belt buckle. Not above it, not below it. That is the sweet spot for a clean, polished look. Most tie mistakes come down to starting in the wrong position, so keep this in mind from the very first step.
Quick Tip: Always stand in front of a mirror when you are learning. It makes it much easier to see what your hands are doing — especially for steps that involve looping or tucking.
The 3 Tie Knots You Should Actually Know
There are technically 85 different ways to tie a tie — yes, researchers at Cambridge University actually worked that out. But the truth is, you only need to know three. These cover every single occasion you will ever face in real life.
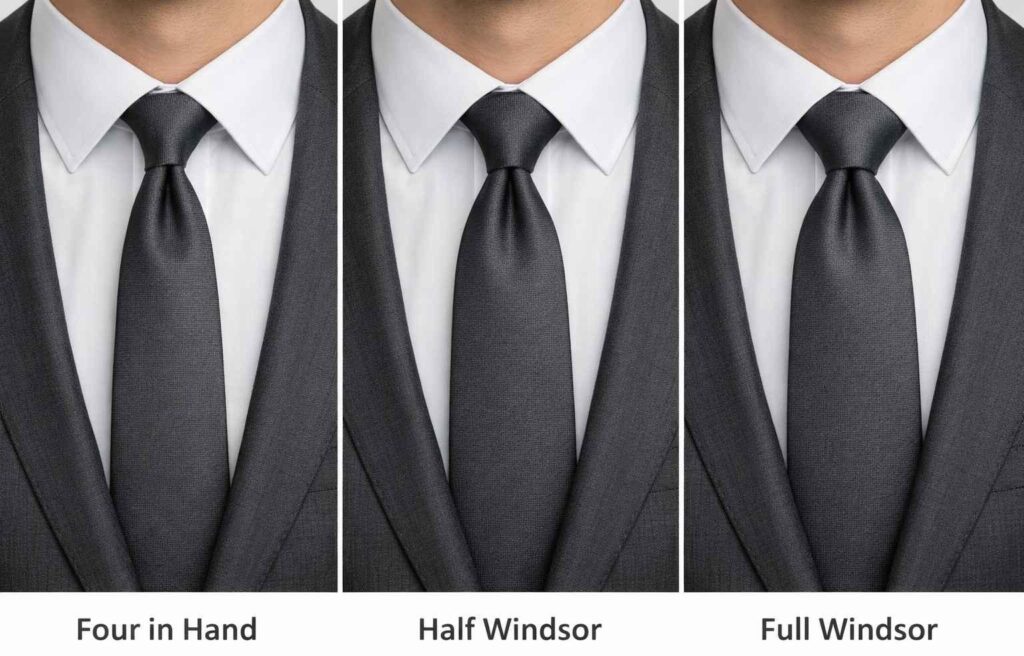
Four-in-Hand — Easy — Best for casual, everyday wear — Works with narrow or point collars.
Half Windsor — Medium — Best for office and smart-casual occasions — Works with most collar types.
Full Windsor — Formal — Best for weddings, presentations, and interviews — Works best with wide or spread collars.
Start with the Four-in-Hand. Once you have that one down, the Half Windsor will feel natural. The Full Windsor is just a few extra steps on top of that. Think of them as levels in a video game — one unlocks the next.
How to Tie a Tie Easy: The Four-in-Hand Knot (Best for Beginners)
The Four-in-Hand is the knot most people learn first, and for good reason. It takes about six steps, it is slightly asymmetrical (which actually gives it a relaxed, stylish look), and it works best with narrow collars and heavier fabrics. If you are in a hurry, this is the one.
My friend Carlos wore this knot to his first ever job interview at a law firm — he had practiced it just twice the night before. He got the job. The Four-in-Hand looks effortless because it actually is.

Step 1 — Drape the tie around your neck. Raise your shirt collar and put the tie around your neck, seam facing inward. The wide end should hang about 12 inches lower than the narrow end on your right side.
Step 2 — Cross the wide end over the narrow end. Take the wide end and bring it horizontally across the narrow end from right to left. This is your starting cross — the foundation of the entire knot.
Step 3 — Wrap the wide end underneath. Bring the wide end back under the narrow end from left to right. You are building up the knot body now.
Step 4 — Cross the wide end over the front again. Bring the wide end across the front of the narrow end one more time, going from right to left. The knot is starting to take shape.
Step 5 — Pull the wide end up through the neck loop. Push the wide end up through the loop sitting at your neck — the one between the tie and your collar. Pull it all the way through.
Step 6 — Slide it through the front loop and tighten. Tuck the wide end down through the horizontal loop you created in Step 4. Tighten slowly by holding the narrow end and sliding the knot up toward your collar. Center it, and you are done.
Pro Tip: If your tie ends up too short, start again with the wide end hanging a couple of inches lower than before. Tie length is all about your starting position.
How to Tie a Tie Step by Step: The Half Windsor Knot
The Half Windsor is the knot that belongs in everyone’s regular rotation. It creates a clean, symmetrical, medium-sized triangle at your collar — not too chunky, not too small. It works with almost every shirt collar type, which is why so many people call it the “go-to” knot for office days, smart events, or anywhere you want to look put-together without overdoing it.
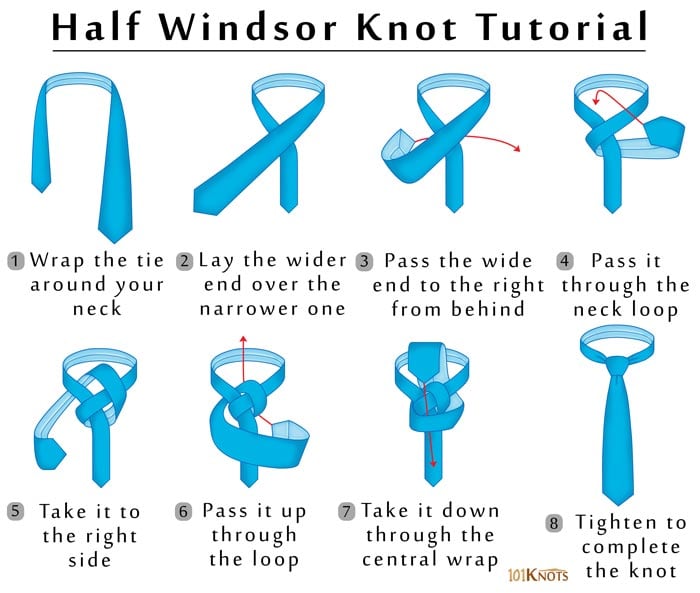
Step 1 — Start position. Drape the tie around your raised collar. Wide end on the right, hanging about 12 inches below the narrow end.
Step 2 — Cross wide over narrow. Bring the wide end over the narrow end to the left, creating a cross right under your chin.
Step 3 — Loop under and to the right. Take the wide end behind the narrow end, pulling it up and to the right through the neck loop. Then bring it back down to the left.
Step 4 — Wrap across the front. Bring the wide end across the front of the knot again, going from left to right this time. You will see the knot growing wider and more triangular.
Step 5 — Go up through the neck loop. Push the wide end up through the loop at your neck, pulling it all the way out the front.
Step 6 — Tuck through and tighten. Thread the wide end through the horizontal band at the front of the knot. Hold the narrow end and slide the knot up gently until it sits snugly at your collar. Adjust until centered and sharp.
Also Read:
How To Draw A Face.
The Full Windsor Knot: For Weddings, Interviews, and Big Moments
The Full Windsor is the heavyweight of tie knots. It creates a wide, perfectly symmetrical triangle that fills the collar beautifully. This is the one you reach for when the occasion truly matters — a wedding, a formal interview, a black-tie dinner. Worn with a wide spread collar, it is commanding, polished, and impossible to ignore.
It does use more of the tie’s length than other knots, so if you are on the taller side, you might find a slightly shorter tie works better. The steps are similar to the Half Windsor — just a couple of extra wraps that give the knot its extra width and bulk.
Credit : @realmanrealstyle
Good to Know: The Full Windsor requires an extra loop on the left side before you finish. If your knot looks identical to a Half Windsor, you probably skipped that step. No stress — just start again slowly.
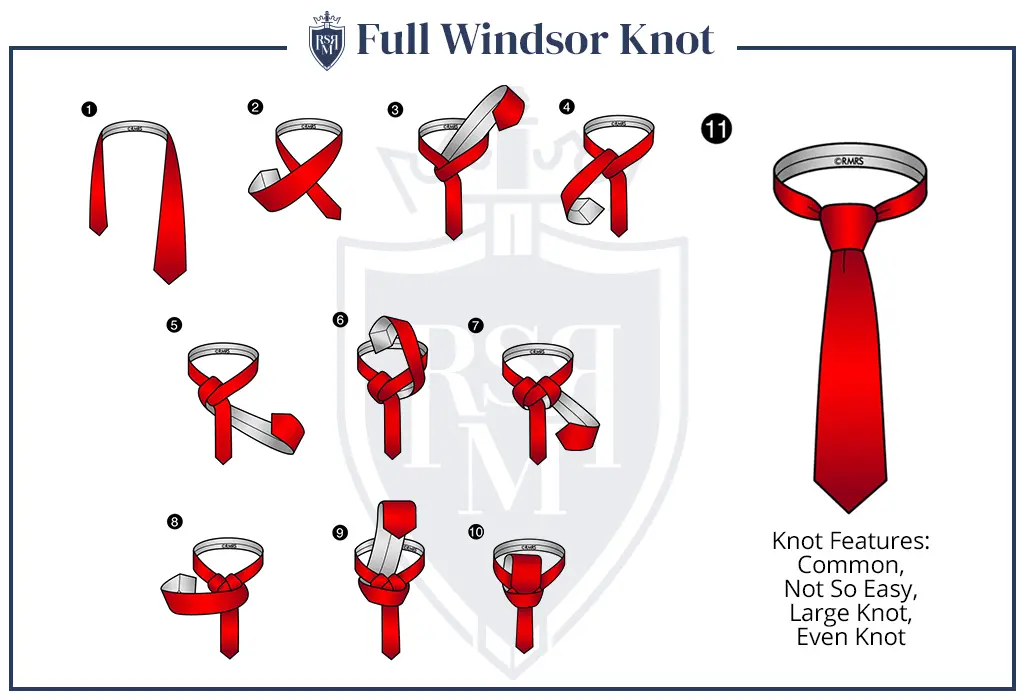
Step 1 — Start with more length. Start with the wide end hanging about 15–16 inches below the narrow end — a bit more than usual — to account for the extra wrapping.
Step 2 — Cross wide over narrow. Wide end goes over the narrow end to the left, just like before.
Step 3 — Go up through the neck loop, then left. Push the wide end up through the neck loop and pull it to the left. Wrap it under the front of the knot from left to right.
Step 4 — Extra wrap: left side loop. This is the step that makes it a Full Windsor. Pull the wide end behind the knot and bring it up on the left side, creating a second layered loop on that side.
Step 5 — Cross over to the right. Bring the wide end across the front of the knot, going from left to right once more.
Step 6 — Up through neck loop and tuck. Take the wide end up through the neck loop, then slide it down through the horizontal front band. Pull gently and tighten slowly. Slide up to your collar. You should see a full, thick, symmetrical triangle.
The Tie Dimple: The Small Detail That Makes a Big Difference
Here is the detail that separates a good-looking tie from a great one. A tie dimple is a small, intentional crease right below the knot. It adds depth, keeps the blade hanging naturally, and signals that you actually know what you are doing.
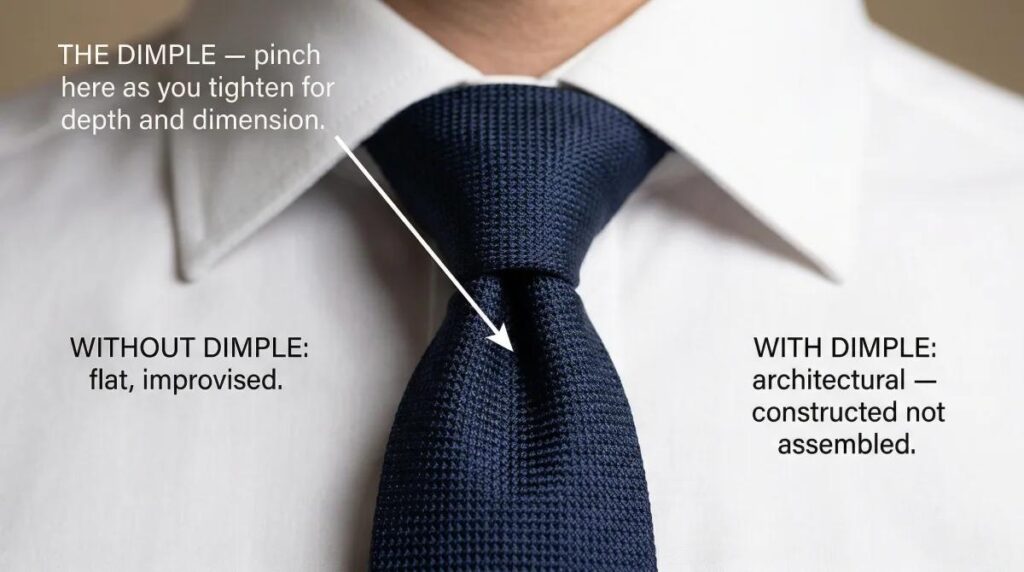
Making a dimple is simple. When you are about to tighten your knot for the final time, use your index finger and thumb to pinch the fabric just below the knot, creating a fold in the center. Hold that fold in place while you pull the knot snug with your other hand. That little crease will stay locked in position and give your tie that editorial, magazine-worthy look.
Style Note: The dimple works best with the Half Windsor and Full Windsor. It is less critical on a Four-in-Hand because that knot’s slightly casual nature is already part of its charm.
Common Tie Mistakes (And How to Fix Them Fast)
Even people who have been tying ties for years sometimes get these wrong. Here are the most common issues and how to sort them out before you leave the house.
The tie is too short. This almost always means you started with the wide end too high up. Undo it completely and begin again with the wide end hanging a few inches lower. Every knot needs slightly different starting lengths — the Full Windsor needs the most room, the Four-in-Hand the least.
The knot looks uneven or lopsided. This usually happens when you rush the wrapping steps. Slow down on steps three and four, and make sure your loops are sitting flat and centered before you tighten. A crooked knot is nearly impossible to fix without starting over.
The narrow end pokes out from behind the blade. This means your final tuck did not go all the way through, or the narrow end is too long. You can tuck the narrow end behind the label keeper loop on the back of the wide blade. That loop is there exactly for this reason.
The knot keeps sliding sideways. This means you are not centering it properly as you tighten. Hold both sides of the knot firmly between your fingers while sliding it up, so it tracks straight to the collar button.
Which Tie Knot Should You Choose? A Quick Guide
Not every knot suits every situation. Here is a quick way to decide without overthinking it. If you are getting dressed for something casual — a dinner out, a school presentation, a smart-casual Friday — the Four-in-Hand keeps things easy and unpretentious. It takes under a minute once you know it.
For anything office-related — a regular workday, a client meeting, a birthday dinner — the Half Windsor is your friend. It is clean, symmetrical, and works with virtually every shirt collar and tie fabric you own. Most men wear this knot more than 80 percent of the time.
If you are heading to a wedding, a formal interview, or any event where you want to look your absolute best, go with the Full Windsor. Pair it with a spread collar shirt (the collar points angle outward rather than pointing straight down) and you will look like you stepped out of a fashion spread.
One Rule to Remember: Match the knot size to the collar size. A big knot in a small collar looks crammed. A small knot in a big spread collar looks lost. When the knot fills the collar space, you have got it right.
How to Take Care of Your Tie So It Always Looks Great
A tie that looks sharp is one that has been treated well. Knowing how to tie a tie is only half the story — the other half is keeping it in good shape so it holds that clean, crisp look every time you wear it.
Never leave your tie in a tight knot overnight. After you take it off, loosen the knot slowly and carefully, pulling from the narrow end — doing it the same way you tied it, just in reverse. Yanking the wide end through quickly will stretch the lining and permanently misshape the knot area. After untying, give it a gentle tug along its length to straighten it out, then hang it loosely or roll it lightly.
Most ties should not go in the washing machine. Silk, wool, and linen all need careful handling. If you get a small spot on your tie, dab it gently with a cold damp cloth — do not rub. For stubborn stains, take it to a dry cleaner. Ironing a silk tie directly can damage it permanently; instead, hold a steam iron a couple of inches above the fabric and let the steam do the work.
Storage Tip: Rolling ties into loose cylinders and storing them upright in a drawer is one of the best ways to keep them wrinkle-free without a tie rack. Just do not roll them too tightly.
How Long Does It Take to Learn? Here Is the Honest Answer
Most people can tie a decent Four-in-Hand after three to five tries. The muscle memory kicks in surprisingly fast once your hands know the order of the steps. The Half Windsor usually takes a few more practice sessions — maybe ten to fifteen tries over a couple of days, before it starts feeling natural. The Full Windsor might take a week of practice before it consistently looks clean.
The best thing you can do is practice in a low-pressure moment, not on the morning of the event. Grab a tie on a Tuesday evening when you have nowhere to be, stand in front of your bathroom mirror, and work through each step slowly. Use this guide step by step, re-reading as needed. Within a week, your hands will remember what to do without you having to think about it at all.
My neighbour’s son, Amir, was 14 when he asked me to teach him how to tie a tie before his school prom. We spent maybe 20 minutes together. By the end, he had the Four-in-Hand down clean. Three weeks later he sent me a photo at prom looking absolutely sharp. The skill stays with you forever once you have it.
Frequently Asked Questions
What is the easiest tie knot for a beginner?
The Four-in-Hand is universally considered the easiest tie knot to learn. It only has six steps, it ties quickly, and it works well for casual occasions, interviews, and everyday wear. Most people get it right within three to five tries. Once you have it down, you can move on to the Half Windsor, which is the most practical knot for regular wear.
How long should a tie be when it is tied?
A properly tied necktie should end right at your belt buckle — not above it and not below it. This is the classic, clean standard that works for every knot style. If your tie is consistently too short, start with the wide end hanging lower before you begin tying. If it ends up too long, start a little higher.
Which tie knot is best for a job interview?
For a job interview, the Half Windsor is usually the best choice. It is clean, symmetrical, and reads as professional without being overly formal. If it is a very senior or formal role — such as law, banking, or executive level — the Full Windsor with a wide spread collar conveys maximum authority and polish. Avoid the Four-in-Hand for formal interviews as its casual asymmetry can look slightly underdressed.
Why does my tie knot always look uneven?
An uneven knot is almost always caused by rushing the wrapping steps or pulling too hard too early. Go slowly, keep each loop flat and centered before moving to the next step, and tighten gradually at the end rather than all at once. Also, make sure you are working in front of a mirror so you can see the symmetry as you go. If it still looks off, undo it and start completely fresh.
What is a tie dimple and do I really need one?
A tie dimple is a small fold or crease in the fabric just below the knot. You create it by pinching the fabric with two fingers before tightening the final pull. You do not need it, but it genuinely improves the look of a tie — it adds dimension, helps the tie hang straight, and is a hallmark of someone who knows how to dress well. It takes about two extra seconds and is well worth making a habit of.
Wrapping Up: You Have Got This
Learning how to tie a tie is one of those small skills that pays you back every time you use it. Once your hands know the steps, it takes under two minutes — and that clean, sharp knot at your collar changes the way you carry yourself. People notice it. You notice it.
Start with the Four-in-Hand. Practice it a few times this week, even if you have nowhere important to be. Once it feels easy, try the Half Windsor. From there, the Full Windsor is just a short step further. Before you know it, you will be the one in the bathroom at the family gathering tying everyone else’s ties.
The most important thing is to keep it relaxed. Nobody tied a perfect knot on their first try. Go slow, use a mirror, be patient with yourself — and remember that even the sharpest dressers in the room had a fumbling first attempt just like you.
Now go grab a tie and give it a go. You are closer than you think.


